
Create custom fields
How do I create custom fields for clients or locations?
Open Settings → Custom fields, choose Locations or Clients, then select Add Custom Field. Give the field a label, choose its data type, decide whether it is required and add options when you use a select type. The new field becomes available on every record of the entity type you chose; values remain specific to each record.
Key facts
- Location and client fields are separate. A location field does not appear on clients, and a client field does not appear on locations.
- A definition is account-wide. Once added, the field appears on every record in that tab; only the value is different for each record.
- Types are permanent. Choose Text, Number, Date, Single select or Multi-select carefully because the type cannot be changed after creation.
- Select fields need options. Single-select and multi-select fields cannot be created until at least one option is present.
- Required is a visual rule, not a hard block. It adds a required marker, but the current Product does not prevent a client or location from being created with that value blank.
- Creating and removing fields changes your shared schema. Removing a field archives the definition and hides it, but the Product retains its existing values.
Why this matters
Custom fields give your team one dependable place for agency-specific facts that do not fit Synup's standard client or location profile. A field such as a landing-page ID, territory or renewal date can be stored once, shown consistently on every relevant record and read or updated by Sydekick without rebuilding that context in each conversation.
Steps
Open Settings, then select Custom fields.
Choose the Locations tab for location records or the Clients tab for client records. Check this before you create anything; the two sets of definitions are independent.
Select Add Custom Field.
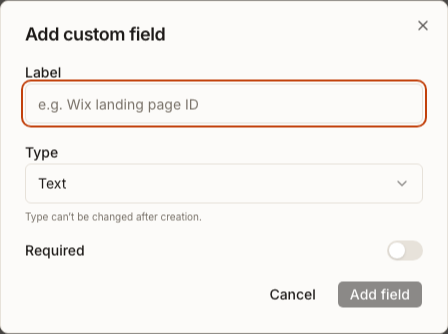
Enter a customer-friendly Label. Synup creates an immutable key from the definition for storing the field's values.
Choose the Type:
- Text for names, IDs, URLs or notes.
- Number for numeric values.
- Date for calendar dates.
- Single select when one option may be chosen.
- Multi-select when more than one option may be chosen.
For a select type, add at least one Option. Turn on Required when your team should treat the field as expected; it does not currently enforce a value when a record is created.
Select Add field. This is the step that creates the shared definition; opening or completing the dialog alone does not change anything.
What you'll see when it's done
- The dialog closes and a success message names the field that was added.
- A new row shows the field label, type and generated key. Required fields also carry a Required badge, and select fields show their option count.
- The field appears in the custom-fields section of every client or location record in the tab you chose.
Watch out for
Questions people ask
What should I check before I begin?
Decide whether the data belongs to a client or a location, choose the type and prepare the allowed options for a select field. Also decide whether your team should see a Required marker. That marker does not currently stop records from being saved without a value.
How will I know the workflow is complete?
Look for the success message and the new definition row. The row's label, type, generated key, Required badge and option count let you confirm the schema before you start entering values on records.
Next
Return to the Settings guide to configure another part of your workspace, or review member access before deciding who should manage shared account definitions.