
Manage location media
How do I upload and manage location media?
Select the client, then open Clients → All locations → Media to upload reusable photos or videos and assign them to the correct locations. This client-library assignment does not publish the media to a live listing. To update a connected Google location, open that location’s Media card, select Edit media, review the Google categories, and select Save.
Key facts
- The client Media library accepts JPEG, PNG and MP4 files, with up to 50 files in one upload.
- Library filters can narrow media by type, category or assigned location. Search checks the filename or location.
- A category describes the media’s purpose. Labels are internal organizers and do not change the category.
- Assigning an item in the client library records which locations it belongs to; it does not publish the item to those locations’ live listings.
- Saving the Media card on a location publishes the reviewed media to Google when that location is connected.
Why this matters
A shared library helps a multi-location team reuse brand assets without losing track of the branches they belong to. Publication is a separate, location-level decision because the same brand can have different storefront, team or product images at each branch. Reviewing the location and Google category before saving reduces the risk of sending the right image to the wrong branch or placing it in the wrong category.
Steps
Open Clients → All locations and select the client whose media you want to manage. Select the Media tab.
Review the existing library before adding files. Use Search filename or location…, Type, Category and Locations to find assets already available for the client. Select a file to preview it; the preview also lets you copy its URL or open the original.
Select Upload Media. Add JPEG or PNG images or MP4 videos, choose a category, and select Upload. You can add up to 50 files in one upload.
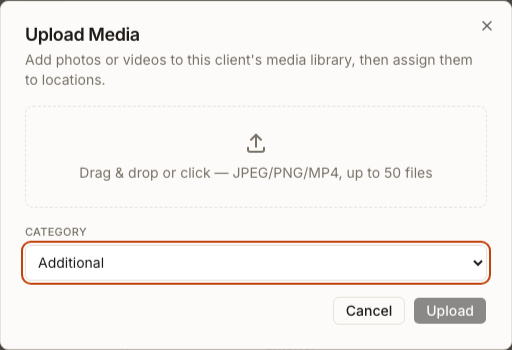
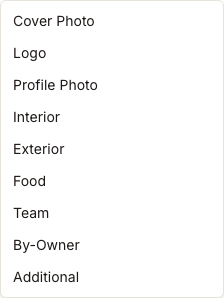
Choose the category that best describes how the asset should be used. The client library offers categories such as Cover Photo, Logo, Profile Photo, Interior, Exterior, Food, Team, By-Owner and Additional.
Select one or more library items to organize them. Use Add Labels for internal labels, Change Category to correct their purpose, or Assign Locations to choose the client locations those items belong to. Assignment sets the selected items’ location list to the locations you choose.
To prepare media for a live Google listing, return to Manage, open the correct location, and find its Media card. Check the business and address first so you know you are editing the intended branch.
Select Edit media. Review the media grouped by Google category, such as Cover, Logo, Outside, Inside, Product, Food & drink, Team or Additional. You can upload media, add an unused category, reorder categories or images, move a photo to another category, star an item, or remove it from the draft.
Review the branch and category one more time, then select Save. For a connected location, saving publishes the location’s media changes to Google.
What you'll see when it's done
- A successful library upload adds the files to the Media table with their category and upload date.
- Assigned library items show the location or number of locations they belong to.
- The location’s Media card summarizes its item and category counts after a save.
- The Edit media drawer closes after Synup saves the location-level media changes.
Watch out for
Questions people ask
What should I check before I begin?
Confirm the client and the location’s business name and address. Decide whether you are organizing a reusable client asset or changing a live location: use the client Media tab for the library, and the location’s own Media card for Google publication.
Does assigning media publish it to a listing?
No. Assignment records which client locations a library item belongs to. Publishing is the separate location-level workflow: open the location, review Edit media, and select Save for a connected Google location.
Why can’t I change an item from the Media library?
The item may be tied to a location through that location’s own Media card. Those items are read-only in the client library; open the named location and edit its Media card instead.
What happens if I delete a category from the location editor?
Synup moves that category’s photos to Additional so they are not lost. If you delete Additional while it contains media, Synup asks you to confirm the removal.
Next
Use search and filters to open the correct location before making branch-specific changes. Review the location’s business information when its name, address or other listing details also need correction.