
Client portal users
How do I invite and manage the people who sign in to a client's portal?
Open Settings → Client users to see everyone who can sign in to your clients' portals, across all clients. Select Add user to add one person, choose their client and locations, and tick Send invitation now. To invite several people at once, tick their rows and use Invite to client portal in the bar at the bottom. Your own team is managed separately in Members.
Key facts
| Where it lives | Settings → Client users, directly below Members. Each client's page also lists its own portal users |
| Members vs Client users | Members are your agency's team. Client users are people at each client who sign in to that client's portal |
| First person on a client | Becomes the portal Owner and sees every location |
| Everyone else | Sees only the locations you assign, plus new ones if Include future locations is ticked |
| Statuses | Not invited, Invited, Active, Disabled, and Queued for an invitation waiting on your email domain |
| Invitations need | A portal domain. Without one, people can be added but no invitation is sent |
| Bulk invitations | Run in the background. You're notified when they finish |
Why this matters
Portal access is how your clients see their own reviews, listings and reports. Use this list to review and control access to each client's portal. Limiting each person to the right locations keeps a franchisee or store manager from seeing other branches.
Steps
Open Settings → Client users and select Add user.
In Client, search for and select the client.
Enter First name, Last name and Email.
If the client already has an owner, choose the locations this person can see in Locations. Tick Include future locations if locations added to this client later should be given to them automatically.
If the client has no portal users yet, the dialog says the person becomes its owner and sees every location, and there are no locations to pick.
Tick Send invitation now to email them. Clear it to add them without sending an email. The button reads Add and invite or Add to match.
Select the button. You'll see one of: name@company.com added and invited., name@company.com added., a message that the invitation is queued, or Added, but the invitation could not be sent with the reason.
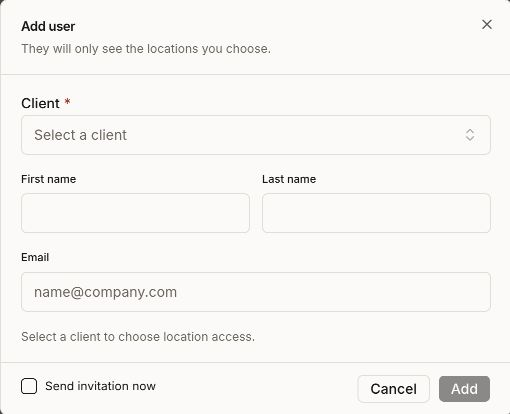
Add one person
Invite several people at once
- Filter the list if it helps: Search by name, email, or client, the Client filter, or Date added.
- Tick the people you want. Your selection is kept when you change pages, and cleared if you change a filter.
- In the bar at the bottom, select Invite to client portal · N of M eligible. Only people never invited are eligible. If some selected people were invited before, a separate Resend invitation action appears for them.
- The dialog shows Recipients with a count, for example 28 client users will receive this email. Select View to check the list. A Skipped line explains who's left out, such as already active, disabled, or already invited.
- Edit the email if you need to. Use Preview as to see it as a specific recipient, with their own client's details filled in.
- Select Send to N. A progress bar shows N of M done, with sent, queued and failed counts.
- You can select Run in background and carry on; you'll be notified when it's done. When it finishes, select Retry failed if any failed, then Done.
Change a person’s access
Open the three-dot menu on a row:
| Action | What it does |
|---|---|
| Send invitation / Resend invitation | Emails a sign-in invitation. Not shown for people who are active or disabled |
| Edit locations | Opens Modify assigned locations. Not available for the owner, who always has every location |
| Make owner | Makes this person the portal owner |
| Disable / Enable | Stops or restores their access without removing them |
| Remove | Removes them from the client's portal users |
To withdraw a client's outstanding invitations, open the client's page and use the actions menu at the top right. Revoke invitation acts on the whole client, not one person. Every unused sign-in link for that client stops working immediately, and every portal user who was invited but never signed in is removed from the list. Because the option disappears once anyone from the client signs in, it never removes someone who already uses the portal; to stop a person later, use Disable on their row. The option appears only while the client has an invitation outstanding and nobody from that client has signed in to the portal yet. Synup asks you to confirm first.
Location access at a glance
| Person | Locations they see |
|---|---|
| Owner | Every location of the client, always |
| Member with chosen locations | Only those locations |
| Member with Include future locations | Their chosen locations plus locations added to the client later (shown as Gets new locations) |
Example: a restaurant group has five locations. Its marketing lead is the owner and sees all five. The manager of the Elm Street restaurant is added with only Elm Street selected and Include future locations unticked, so a sixth location added later stays hidden from them.
Worked example
Say you're onboarding a physiotherapy client with clinics in several towns. Select Add user, choose the client and enter the clinic director's details. The client has no portal users yet, so the dialog says the director becomes its owner and will see every location. Next, add the front-desk coordinator for one clinic. Select only that clinic in Locations, leave Include future locations unticked and tick Send invitation now.
Afterwards, check the list. The coordinator's Assigned locations should show just that clinic, and their status should read Invited with the date it was sent. If your email domain is still verifying, the status reads Queued until the invitation goes out.
What you'll see when it's done
- The person in the list with their client, status and Assigned locations
- Invited with the date the invitation was sent, then Active with a Last sign-in after they sign in
- For a queued invitation, Queued until your email domain finishes verifying
Watch out for
- Queued is not failed. If your email domain isn't verified yet, invitations wait and go out automatically once it is. Until then the person can't sign in.
- The first person becomes the owner. Check you're adding the right contact first.
- The owner can't be removed directly. Use Make owner on someone else first.
- Revoking affects everyone invited to that client. All unused sign-in links stop working, and people who never signed in are removed and have to be added again. Check the client's list before you confirm.
- Selection resets when filters change. Re-check your ticks after searching or filtering.
Questions people ask
What's the difference between Members and Client users?
Members are people on your agency's team. Client users are people at your clients who sign in to that client's portal. They are separate lists in Settings.
Why does my invitation say Queued?
Your email domain isn't verified yet, so nothing has been sent. The invitation goes out automatically when verification finishes.
Why can't I edit the owner's locations?
Owners always have access to every location of their client. To limit that person, make someone else the owner first.
Some of the people I selected were skipped. Why?
The invite action only goes to people who were never invited. People already active or disabled are skipped, and people already invited need Resend invitation instead.
Next
- What portal users see when they sign in: open and navigate the Client Portal
- Portal settings for one client: configure a client workspace
- Set up the domain invitations come from: configure a branded domain
- Your team: invite and manage members